This article is written for those who need to test/evaluate features of new WordPress release on a local machine before rolling it out to all the serves.
This article describes running PHP on IIS 7.5 through FastCGI.
For best results, reader is required to be able to start and stop services, understand registry manipulations, be comfortable with copy and paste inside a command prompt (Alt+Space, E, P).
To achieve better portability, try to match your test machine directory structure as close as possible with your server.
| Other IIS Features to Pick |
|---|
| If you are planning to test old ASP sites on the same machine, you also need to pick: |
| – ASP option here and |
| – IIS 6 Scripting Tools under Web Management Tools – IIS 6 Management Compatibility |
| – Basic Authentication under Security, if some of your sites require that. |
| Also, use this opportunity to uninstall any features you are not using (Games). |
Configure IIS 7.5
Windows 7 comes with IIS 7.5, but it is not installed by default. Install IIS 7.5. IIS 7.5 comes with FastCGI. So, pick a CGI option under Application Development Features.
Windows 7 prompts you to restart.
Test your web server by visiting http://localhost/
If you want to move your inetpub directory (optional step), there is an article to do that. The reasons to move inetpub away from operating system drive could be:
– to keep all the web sites directories together;
– logistical requirement to access your IIS Configuration from several parallel instances;
– security requirement to separate OS and WEB.
 Install Latest PHP
Download latest PHP from http://windows.php.net/download/
At the time of this article latest PHP version is 5.3.6. Pick VC9 x86 Non Thread Safe package
A good explanation of a difference between Thread Safe and Non Thread Safe packages is at:
In this article, we will run PHP using FastCGI option. It means you need to pick VC9 x86 Non Thread Safe package
(php-5.3.6-nts-Win32-VC9-x86.msi).
If you didn’t install CGI with IIS earlier, you probably will run PHP using ISAPI and in that case you need to pick VC9 x86 Thread Safe package (php-5.3.4-Win32-VC9-x86.msi).
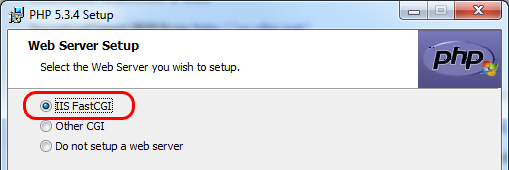
Pick IIS FastCGI option. Under features make sure you are installing MySQL extension. Also, if your WordPress site uses any kind of spam protection CAPTCHA functionality, you most likely need to install GD2 extension.
To test your installation create a text file info.php in your wwwroot directory and put just one line of code in it:
<?php phpinfo(); ?>
Now, visit http://localhost/info.php You should see a purple and gray page with PHP system information in a table. To my surprise I didn’t have to make any modification to php.ini and I didn’t have to make any configuration changes in IIS Admin. FastCGI was automatically mapped to php-cgi.exe without any manual intervention.
Install MySQL and Migrate Your WordPress Database
Download and install MySQL from http://dev.mysql.com/downloads/mysql/
At the time of the article the latest MySQL package available was MySQL Community Server 5.5.14 (mysql-5.5.14-winx64.msi).
You have to pick either x32 or x64 package.
Right during installation you can specify custom location for your MySQL program files and custom location for your MySQL database files. We will move data files and modify MySQL.ini in the next step.
Select and write down MySQL root password during installation. We will use it several times later.
There is one little thing we have to fix here. Say you want MySQL data to go to X:\DB\MySQL. Installation would add one more directory “data” to your path, and now MySQL database are sitting in X:\DB\MySQL\data. We need to eliminate this unneeded extra directory. It takes four easy steps:
-01- Stop MySQL service
-02- Move the files
-03- Modify MySQL.ini datadir to point to a new location
-04- Restart MySQL service
Use the latest database backup from your production system and restore your WordPress database to this machine. To generate a database backup file you can use this command from a command prompt:
%YourInstallPath%\bin\mysqldump.exe" -u DB_User -pUserPassword YourDB > C:\DB.sql
Before restoring your database on a new test machine you need to create all users and grant them required rights. Use MySQL Command Shell.
I just noticed that new install didn’t create a shortcut for MySQL Command Prompt. Not a problem. Create a Command Prompt shortcut with this command string in it:
%YourInstallPath%\bin\mysql.exe -u root -p
If you add your MySQL root password immediately after -p without a space, you can enter the shell with one click.
Now you need to execute series of commands to create your empty database and create a user:
CREATE DATABASE YourDB;
CREATE USER DB_User@localhost IDENTIFIED BY 'UserPassword';
SELECT user FROM mysql.user;
GRANT ALL ON YourDB.* TO DB_User@localhost;
FLUSH PRIVILEGES;
Do not close MySQL command shell yet.
Now you are ready to restore your saved D/B into this MySQL instance. Do this from a Command Prompt:
%YourInstallPath%\bin\mysql.exe -u DB_User -pUserPassword YourDB < C:\T\DB.sql
You might need to use ” ” around your path, if it contains spaces. This one line does the trick.
Last thing here is to fix 2 values in database itself. Return to MySQL Shell and paste these commands:
USE YourDB select option_name, option_value from wp_options where option_name in ("home", "siteurl"); update wp_options set option_value = "http://192.168.0.123/" where option_name in ("home", "siteurl"); select option_name, option_value from wp_options where option_name in ("home", "siteurl");
Your new test WordPress install will be accessed using some local Internet path. That is the change that we just did. Obviously, for your situation use either local IP Address of your machine, or http://localh0st/. Advantage of using IP Address is that you would be able to test your site from other local to your network machines.
Now we are ready to play with new WordPress.
Install and Configure WordPress 4.X
Now we a finally ready to install and experiment with the latest WordPress 4.1.1. Get the latest version from http://wordpress.org/
Create a new directory to hold your WordPress test site. Use IIS Admin to create a new site and bind it to a new port. For this test, I will bound default site to port 81, and that will free default port 80 for my test WordPress site.
Do not forget to Unlock your ZIP file with right-mouse click, Properties, Unlock. Unzip into a new directory, that you just created earlier.
File wp-config-sample.php should land directly in the root of a new WordPress site along with other files and directories. Open this file with Notepad and make these 3 changes to it:
define('DB_NAME', 'YourDB'); define('DB_USER', 'DB_User'); define('DB_PASSWORD', 'UserPassword')
Save this file as wp-config.php and you are ready to navigate with your favorite browser.
Navigate to either http://localhost/wp-admin or http://192.168.0.123/wp-admin whatever you specified as “home” in your MySQL database earlier.
You should see a login page. Use login credentials from your production site. They migrated along with database.
The Next Big Thing – Retrofitting
You noticed that all your images are missing, your theme is not there, and non of the plug-ins appear to work. That is correct! It is time to download and install all the latest versions of Themes and Plug-ins, that were installed on your production system. You will be testing those as well.
Also, you need to copy content of folder \wp-content\uploads to bring all your images from production site. Also default IIS user (usually IIS_IUSRS or IUSR) should have Write permissions to this folder. But for some reason, even without this permission site allows to upload images into this location.
The scope and success of your retrofit effort (inserting back all the code modifications that you’ve done before) depends on how well you documented the changes. And if you installed a beta WordPress version, do not kill yourself in retrofitting all the modification. Remember you are after new and exciting features. You are testing if your Theme work as expected with a new WordPress. The real retrofit effort will come with the final release of WordPress.


статья super, автору респект
Хороший у вас блог, дизайн очень понравился, со временем будет мощный блог
Мне понравился ваш блог, прочитал массу интересных статей, спасибо!
Отличный блог у вас, много интересных постов, буду постоянным читателем!
Хороший у вас блог! удачи в развитии
Hello ! I’m new on this forum, hope to talk to you soon :)
I love carsn seotons and tuning, and you ?