This article is about moving your Windows-based WordPress and other sites (some ASP, some ASP.NET) from older to a newer instance using AMAZON cloud server instances. Procedures described here do not involve any installation. Just copy files and edit CONFIG files. We do not manipulate Registry as well (except to change inbound RDP port).
Sample installation in this article was tested on Amazon Small instance. Image used was Windows 2012 Server x64 with SQL Server2012 Express. This article can be used to create you own check list while preparing to migrate to a new Amazon server.
Why would you decide to upgrade or move to a new instance/server? Here are some driving reasons: Something is no longer working on old instance. Vital services (MySQL) take extremely long time to start. Your software versions (Windows PHP, are getting stale, and no longer supports new functionality. Your current AMAZON server hard drive is too large, and you need to reduce its size to save money. (Note: to increase volume size use simple backup and restore procedure. The same technique doesn’t work, if you want to decrease your volume size.)
New Amazon instance
Preliminaries
To launch a new instance you already need to:
Decide what would be the size of your new server hard disk? – RDP into your current instance and analyze disk usage. Look how much free space is available and decide, if you need to grow or to shrink.
Allocate New IP Address – Make sure it is for VPC (for your virtual network) not just default EC2
Confirm zone, where you current instance is running. Example: us-east-1d. This is only needed for EC2 classic instances.
Your virtual security group is already setup and functioning
Select a good starting image:
Browse for a very good match for a prototype image for your future instance
(For example Microsoft Windows Server 2021 with SQL Server Express and IIS x64 bit)
Launch a new Instance
Login to your Amazon EC2 account
https://console.aws.amazon.com/ec2/home#s=Instances
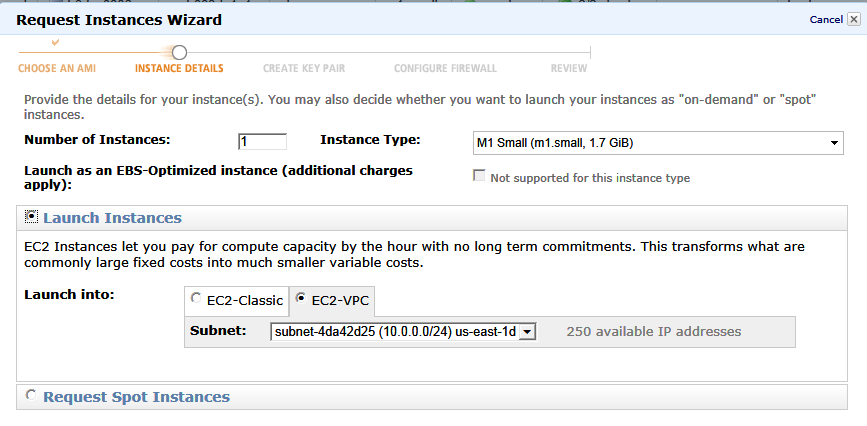
Classic “Launch Instance” wizard was dramatically improved, and now allows for most popular requirements to be accommodated:
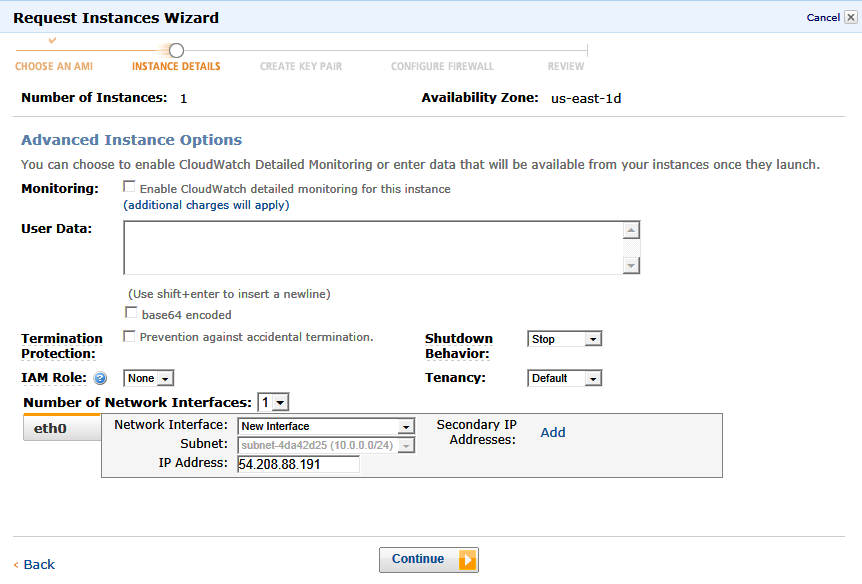
Do not type in your new IP address on this screen. You will get an error message later. You will be able to associate an IP address later, while instance is initializing.
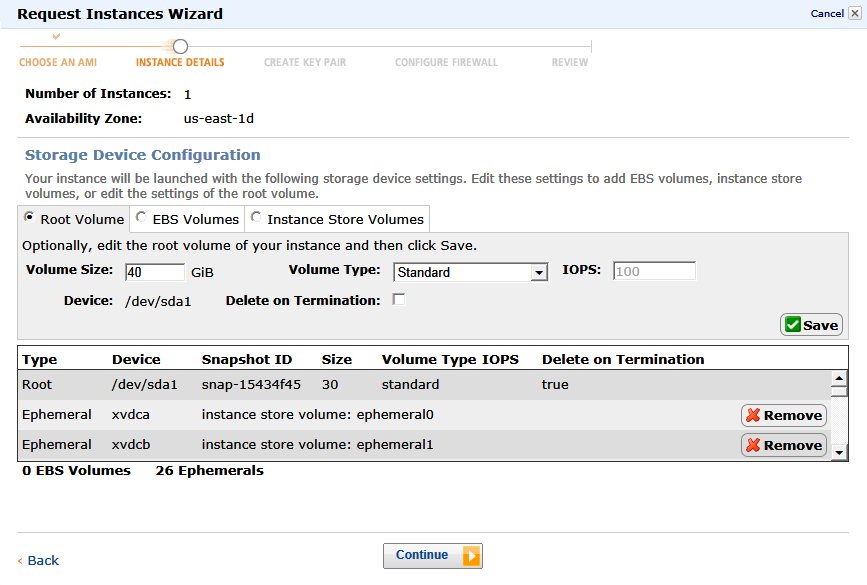
Press Edit button and edit the size of the volume to be created. You do not pay for Ephemeral volumes, but they or very little help. They get wiped out every time you restart the instance.
Important! Do not forget to press Save button. You new drive size should appear in the grid below.
On the next screen (not shown) name your instance, for example “50GB + Ephemeral”
On the next screen (not shown) pick from existing security key pair or create a new one.
On the next screen (not shown) choose from existing security groups
Finally, review the settings and start the instance:
Associate IP address while instance is launching (initializing).
If you have a strict port security on your AMAZON Security Groups, you would need to allow (open) inbound entry on port 3389 just to be able to change it to your custom port later.
Add rule RDP to segment XX.XX.XX.XX/32 to enable access only from your current location
Get your ADMIN password. Select Instance. From Actions –> Get Windows Admin Password
Paste your private key (text with hundreds of random characters) into provided box and click Decrypt password
User: Administrator
Password:
Connect to your new instance
Now you are ready to RDP to your new instance
To troubleshoot connection issues here click on Instances –> Actions –> Connect
Note: add inbound rule for port 3389 for your Amazon security group
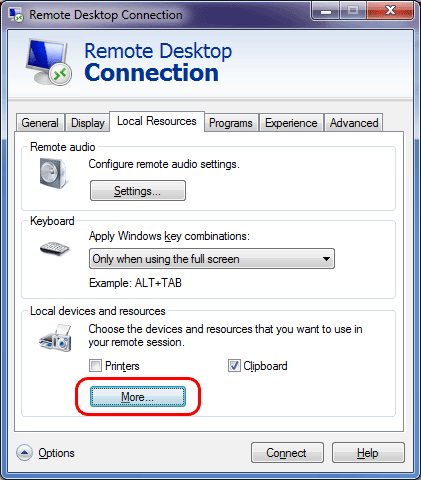
To transfer data back and force to your new server, configure your RDP session to share local drives:
Options –> Local Recourses –> More
Configure your new server
Configure RDP, Users, Appearance
Check your memory (1.7GB) and your hard drive size (40GB – total, 18.6 free)
Check that you have SQL Server Express installed
Note: if you pick anything but Express edition, your per-hour billing rate will increase
Time Zone – Eastern
Date Format – yyyy-MM-dd
Time Format – HH:mm (24H)
NTP Server – bonehed.lcs.mit.edu
Run Windows Update
Temporary remove Password restrictions in Local Security Policy
secpol.msc – Account Policies –> Password Policy
lusrmgr.msc – Reset Admin password and create ADMIN users for backup and maintenance
Rename Groups and Users according to your requirements
secpol.msc – Account Policies –> Password Policy
Enable Password restrictions back in Local Security Policy –
Logout as Administrator – you will never use this user again
* * *
Warning! This section describes, how to change the default RDP port.
Proceed if you understand the steps. You can lock your instance completely out!
New port is marked her as “xxx”.
Login as new user (that you intend to use permanently)
Set Files and Folder Options to be able see file extensions
Change the RDP port from default 3389 to your favorite port number:
Windows Registry Editor Version 5.00
[HKEY_LOCAL_MACHINE\SYSTEM\CurrentControlSet\Control\Terminal Server\WinStations\RDP-Tcp]
"PortNumber"=dword:00000xxx
Open port xxx using Windows Firewall:
– Open Windows Firewall application
– Create a new inbound rule: RDP xxx
– Make sure the new rule is Enabled
Try to connect on a new port
Moment of truth: restart the server and try to connect on your port xxx
Sample: in RDP Computer box type: YourIPAddress:xxx
If you are connected – good job! If you can’t connect – bad luck! You might need to kill the instance and start all over again.
Remove port 3389 from Amazon security group
Close port 3389 in Windows Firewall
Setup an RDP connection with drive letter to transfer data
PHP – Download and Configure
Download PHP
http://windows.php.net/download/
Pick latest x64 Non Thread Safe zip file
Example: php-5.5.1-nts-Win32-VC11-x64.zip
Copy content of a zip file into C:\YourPath
Create new php.ini from file php.ini-production
Add these custom lines to the end of php.ini file:
fastcgi.impersonate = 1
fastcgi.logging = 0
cgi.fix_pathinfo=1
cgi.force_redirect = 0
extension_dir="C:\YourPath\ext"
extension=php_mysql.dll
; Required for Real Simple CAPTCHA
extension=php_gd2.dll
; For sending secure SMTP messages
extension=php_openssl.dll
IIS Manager – Handler Mappings – Add Module Mapping
*.php — FastCgiModule — C:\YourPath\php-cgi.exe — PHP_via_FastCGI
In Request Restrictions configure the mapping to invoke handler, if request is mapped to a file or a folder (last option).
Test PHP
Create info.php
<?php phpinfo(); ?> and test - OK
Troubleshoot PHP Errors
Problem:
HTTP Error 500.0 - Internal Server Error
C:\YourPath\php-cgi.exe - The FastCGI process exited unexpectedly
Error Code 0xc0000135
Solution:
Read from the sidebar on PHP download site:
The VC11 builds require to have the Visual C++ Redistributable for Visual Studio 2012 x86 or x64 installed.
Download and install small (7MB) file: vcredist_x64.exe
Problem:
HTTP Error 500.19 - Internal Server Error
The requested page cannot be accessed because the related configuration data for the page is invalid.
Solution:
Delete web.config file from your PHP site root directory
MySQL – Download and Configure
Download MySQL – mysql-5.6.13-winx64.zip
http://dev.mysql.com/downloads/mysql/
Create MySQL application directory
C:\YourPathMySQL
Place content of mysql-5.6.13-winx64.zip
Create MySQL data directory
C:\YourPathData
Place content of data directory there
Create and edit my.ini file
basedir="C:\YourPathMySQL"
datadir="C:\YourPathData"
port=3306
Start MySQL CONSOLE from command prompt:
C:\YourPathMySQL\bin\mysqld.exe --console --datadir="C:\YourPathMySQL"
Note: to stop MySQL server use:
C:\YourPathMySQL\bin\mysqladmin" -u root shutdown
Create and test MySQL command shell:
C:\YourPathMySQL\bin\mysql.exe -u root -p
Download existing Sites, Scripts and Backups
Prepare to RDP to current/old Amazon instance: add your new IP address to Amazon security group
Connect to current PROD server and copy selective data, scripts, databases|
Copy SITES from old instance to a new instance (using RDP)
Run D/B backup on the old server
Copy D/B backup from old to a new server
Configure IIS
On Windows 2012 Server image IIS is not installed by default. It means that new SQL 2012 can be installed without IIS.
Install Windows IIS components:
=01= Application Development Features –> ASP, CGI and
=02= Security –> Basic Authentication (required if you use ASP sites with files/directory security)
Test local server – http://localhost/
Rename or delete iisstart.aspx
Create default.htm to redirect to a required site:
<script language="javascript">
   document.location.replace("http://www.YourDomain.com/")
</script>
Create your IIS Sites
Set required bindings to ports 80, 8080 443
Set required binding s to YourSites.com
Test your sites
Problem:
HTTP Error 500.19 – Internal Server Error
. . . related configuration data for the page is invalid.
Solution:
This error indicates that your WEB site in IIS is pointing to external network drive
(for example N:\Path instead of C:\Path)
Use windows Firewall to open additional ports (for example 8080)
Test external connection on port 8080:
Test http://YourNewIP:8080/
Create Server Certificates
If you use will HTTPS – Create IIS certificate
Note: server certificate already exist on 2008 image
IIS –> Server –> Server Certificates Create Self-Signed Certificate
Name: YourCertificateName / Store: Web Hosting
SQL – Install a new instance
Note: we recommend to install a new instance and do now use default instance
SQL Server 2012 Express SP1
Download SQLEXPR_x64_ENU.exe
Install your new SQL instance
Root directory – C:\YouPath
Create a new Database From MySQL command shell run:
show databases;
CREATE DATABASE YourDatabase;
SELECT user FROM mysql.user;
CREATE USER YourUser@localhost IDENTIFIED BY 'YourPassword';
GRANT ALL ON YourDatabase.* TO YourUser@localhost;
FLUSH PRIVILEGES;
Restore your latest MySQL database from a backup From a command prompt run:
C:\YourPath\bin\mysql.exe -u YourUser -pYourPassword YourDatabase < C:\Backup\DB.sql
Set WP HOME values to your new IP address:
USE YourDatabase;
select option_name, option_value from wp_options
      where option_name in ("home", "siteurl");
update wp_options set option_value = "http://YourNewIP/"
      where option_name in ("home", "siteurl");
Test ASP sites
When testing ASP sites, ASP errors will be hidden by default
To make ASP errors visible use IIS Admin:
Site – ASP – Debugging Properties – Send Errors to Browser – True
If you see a SQL permission error, work with SQL user security
To add proper security principal for file or directory use user:
NT Service\MSSQL$YourInstance
Restore your SQL databases
Add required users as D/B owner
Enable Basic Authentication
Disable Anonymous Authentication
Test your ASP application
Problem 01:
Error Code – 0x800700b7
Config Error – There is a duplicate ‘system.web.extensions/scripting/scriptResourceHandler’ section defined
Solution 01:
Open SITE with Visual Studio and allow to upgrate to the proposed .NET version
Problem 02:
HTTP Error 404.17 – Not Found
The requested content appears to be script and will not be served by the static file handler.
Solution 02:
Install ASP.NET 4.5 from Windows Roles and Features. It is located under Web Server (IIS) — Web Server — Application Development – ASP.NET 4.5
Problem 03:
Cannot open database “YourDatabase” requested by the login. The login failed. Login failed for user ‘IIS APPPOOL\DefaultAppPool’
Solution 03:
Open IIS Admin – %windir%\system32\inetsrv\InetMgr.exe
Set DefaultApplPool Identity to Network Service
Go-Live
Start migration sequence
Back and restore latest D/B(s)
Make sure that MySQL window is open (if you start MySQL from a command prompt)
Test You WordPress Site:
– Test all major DWC functions: add, edit, send, delete
– Test Letter-to-the-Editor
– Test comments
– Test Registering a new user
Allow Authenticated Users to Modify CAPTCHA directory
This is needed for captcha for letter-to-the-editor page:
\wp-content\uploads\wpcf7_captcha
Set site pointer back to original:
update wp_options set option_value = "http://YourDomainName.com/"
                      where option_name in ("home", "siteurl");
Switch IP address on Amazon EC2 site (all web traffic will go to you new server)
Make your ASP.NET application to work
Restore your database in SQL Studio Manager
IIS – Create new application
Open Web site in VS 2012 and agree to upgrade
Your web.config will be updated
Test your ASP.NET application
If you need a attach files to SQL tables, you need to configure FILESTREAM feature:
EXEC sp_configure filestream_access_level, 2
RECONFIGURE
SQL and MySQL Automated Backup
Export scheduled jobs into XML file on your old server
Import scheduled jobs from XML on you new Amazon instance
Change only user name – old user name will not work
Check/adjust other parameters
SQL backup notes:
Change only user name – old user name will not work
Set permission on the BACKUP\SQL directory with full rights for user name NT Service\MSSQL$YourSQLInstance
where YourSQLInstance you need to replace with the name of your SQL instance.
Set MySQL password for root user
Check which users have passwords:
SELECT User, Host, Password FROM mysql.user;
+---------------+-----------+---------------+
| User          | Host      | Password      |
+---------------+-----------+---------------+
| root          | localhost |               |
| root          | 127.0.0.1 |               |
| root          | ::1       |               |
|               | localhost |               |
| YourMySQLuser | localhost | *xxxxxxxxxxxx |
+---------------+-----------+---------------+
Set password to all three root users:
SET PASSWORD FOR 'root'@'localhost' = PASSWORD('x x x x x');
SET PASSWORD FOR 'root'@'127.0.0.1' = PASSWORD('x x x x x');
SET PASSWORD FOR 'root'@'::1' = PASSWORD('x x x x x');
Change properties for icon for MySQL Shell. Add you new password after option -p
Future to do
After running few days on a new server:
– SQL – Delete/disable existing default SQL instance
– Terminate old Amazon instance
– Delete old volume
– Free up IP address
Install MySQL as a service
That is more convenient. When you restart your server, MySQL service will be re-started automatically without need to login:
mysqld.exe –install
.
Conclusion
It was very interesting venture to write this article based on “road notes” from the last upgrade. As you know, every few years this list goes a dramatic change due to changes both at Amazon and at Microsoft. I was able to capture and resolve all the problem on the way from inception to implementation, and I am glad that I had time to gather all of them here for future reference.
I hope that you enjoy this material as well, and it will save you time during your upgrade.
Be the first to comment